使用Vue模板

本文最后更新于:2021年4月12日 晚上

创建模板项目

vue-cli:官方提供的脚手架工具
vuejs-templates 下载模板项目

  • 创建 vue 项目
    1
    2
    3
    4
    5
    6
    npm install -g vue-cli
    vue init webpack vue_demo #名称不能包含大写
    # vue-router, unit tests 和 e2e tests 两个单元测试包暂时不需要,其余默认
    cd vue_demo
    npm run dev
    # 访问: http://localhost:8080/
  • 模板项目的结构
    1
    2
    3
    4
    5
    6
    7
    8
    9
    10
    11
    12
    13
    14
    15
    16
    17
    |-- build : webpack 相关的配置文件夹(基本不需要修改)
    |-- dev-server.js : 通过 express 启动后台服务器
    |-- config: webpack 相关的配置文件夹(基本不需要修改)
    |-- index.js: 指定的后台服务的端口号和静态资源文件夹
    |-- src : 源码文件夹
    |-- components: vue 组件及其相关资源文件夹
    |-- App.vue: 应用根主组件
    |-- main.js: 应用入口 js
    |-- static: 静态资源文件夹
    |-- .babelrc: babel 的配置文件
    |-- .eslintignore: eslint 检查忽略的配置
    |-- .eslintrc.js: eslint 检查的配置
    |-- .gitignore: git 版本管制忽略的配置
    |-- index.html: 主页面文件
    |-- package.json: 应用包配置文件
    |-- README.md: 应用描述说明的 readme 文件
    |-- node_modules

基本使用

  • vue文件的组成
    分为3部分:模板页面,JS 模块对象,样式

    1
    2
    3
    4
    5
    6
    7
    8
    9
    10
    11
    12
    13
    14
    15
    16
    17
    18
    <template>
    // 页面模板
    </template>

    <script>
    export default {
    data() {
    return {}
    },
    methods: {},
    computed: {},
    components: {}
    }
    </script>

    <style>
    /* 样式定义 */
    </style>
  • 简单案例

    1
    2
    3
    4
    5
    6
    7
    8
    9
    <!-- 结构目录 -->
    |-- src
    |-- assets
    |-- logo.png
    |-- components
    |-- helloworld.vue
    |-- App.vue
    |-- main.js
    |-- index.html
    1
    2
    3
    4
    5
    6
    7
    8
    9
    10
    11
    12
    13
    14
    15
    16
    17
    18
    19
    20
    21
    22
    23
    // helloworld.vue
    <template>
    <div>
    <p class="msg">{{ msg }}</p>
    </div>
    </template>

    <script>
    export default { //配置对象(与Vue一致)
    data() { //必须写函数
    return {
    msg: 'Hello Vue Component',
    }
    },
    }
    </script>

    <style>
    .msg {
    color: red;
    font-size: 30px;
    }
    </style>
    1
    2
    3
    4
    5
    6
    7
    8
    9
    10
    11
    12
    13
    14
    15
    16
    17
    18
    19
    20
    21
    22
    23
    24
    25
    26
    // App.vue
    <template>
    <div>
    <img class="logo" src="./assets/logo.png" alt="logo" />
    <!-- 3. 使用组件标签 -->
    <HelloWorld />
    </div>
    </template>

    <script>
    // 1. 引入组件
    import HelloWorld from './components/helloworld'
    export default {
    // 2. 映射组件标签
    components: {
    HelloWorld,
    },
    }
    </script>

    <style>
    .logo {
    width: 200px;
    height: 200px;
    }
    </style>
    1
    2
    3
    4
    5
    6
    7
    8
    9
    10
    // main.js
    // 入口JS:创建Vue实例
    import Vue from 'vue'
    import App from './App.vue'

    new Vue({
    el: "#app", //index.html里写的名称
    components: { App }, //组件标签名
    template: '<App/>' // 模板插入到el所匹配的页面div里
    })
    1
    2
    3
    4
    5
    6
    7
    8
    9
    10
    11
    12
    13
    14
    15
    16
    <!-- index.html -->
    <!DOCTYPE html>
    <html>

    <head>
    <meta charset="utf-8">
    <meta name="viewport" content="width=device-width,initial-scale=1.0">
    <title>helloworld</title>
    </head>

    <body>
    <div id="app"></div>
    <!-- built files will be auto injected -->
    </body>

    </html>

项目打包与发布

  • 静态服务器工具包
    1
    2
    3
    4
    5
    6
    # 打包,会生成dist文件夹
    npm run build
    # 发布
    npm install -g serve
    serve dist
    # 访问:http://localhost:5000
  • 动态 web 服务器(tomcat)
    1. 修改配置
      1
      2
      3
      4
      5
      // webpack.prod.conf.js
      output: {
      publicPath: '/xxx/'
      //打包文件夹的名称
      }
    2. 重新打包: npm run build
    3. 修改 dist 文件夹为项目名称: xxx
    4. 将 xxx 拷贝到运行的 tomcat 的 webapps 目录下
    5. 访问: http://localhost:8080/xxx

组件间通信

props

todos源文件下载

  1. 使用组件标签时
    <my-component name='tom' :age='3' :set-name='setName' />
  2. 定义 MyComponent 时
    在组件内声明所有的props
    1. 只指定名称
      props: ['name', 'age', 'setName']
    2. 指定名称和类型
      1
      2
      3
      4
      5
      props: {
      name: String,
      age: Number,
      setNmae: Function
      }
    3. 指定名称/类型/必要性/默认值
      1
      2
      3
      4
      props: {
      name: {type: String, required: true, default:xxx},
      age: {type: Number, required: true, default:xxx}
      }
  • 注意
    • 此方式用于父组件向子组件传递数据
    • 所有标签属性都会成为组件对象的属性, 模板页面可以直接引用
    • 问题:
      • 如果需要向非子后代传递数据必须多层逐层传递
      • 兄弟组件间也不能直接 props 通信, 必须借助父组件才可以

vue自定义事件

todos 通信方式修改

  1. 绑定事件监听
    1. 通过 v-on 绑定
      1
      2
      <!-- 给TodoHeader标签对象绑定addTodo事件监听 -->
      <TodoHeader @addTodo="addTodo" />
    2. 通过 $on()
      1
      2
      3
      4
      5
      6
      <template>
      <TodoHeader ref="header" />
      </template>
      <script>
      this.$refs.header.$on('addTodo', this.addTodo)
      </script>
  2. 触发事件
    1
    2
    // 触发事件(只能在父组件中接收)
    this.$emit('addTodo', todo)
  • 注意
    • 此方式只用于子组件向父组件发送消息(数据)
    • 问题: 隔代组件或兄弟组件间通信此种方式不合适

消息订阅与发布

  • 安装 PubSubJS 库 npm i --save pubsub-js
    绑定事件监听 —订阅消息
    触发事件 —发布消息
  1. 订阅消息 PubSub.subscribe('msg', function(msg, data){})
  2. 发布消息 PubSub.publish('msg', data)
  • 注意
    优点: 此方式可实现任意关系组件间通信(数据)
  • 总结: 事件的 2 个重要操作
    1. 绑定事件监听 (订阅消息)
      目标: 标签元素 <button>
      事件名(类型): click/focus
      回调函数: function(event){}
    2. 触发事件 (发布消息)
      DOM 事件: 用户在浏览器上对应的界面上做对应的操作
      自定义: 编码手动触发

slot

此方式用于父组件向子组件传递标签,而非数据。

  1. 子组件 Child.vue
    1
    2
    3
    4
    5
    6
    7
    <template>
    <div>
    <slot name="xxx">不确定的标签结构 1</slot>
    <div>组件确定的标签结构</div>
    <slot name="yyy">不确定的标签结构 2</slot>
    </div>
    </template>
  2. 父组件 Parent.vue
    1
    2
    3
    4
    <child>
    <div slot="xxx">xxx 对应的标签结构</div>
    <div slot="yyy">yyyy 对应的标签结构</div>
    </child>

todos 源文件最终版

vue-ajax

vue-resource

vue 插件, 非官方库, vue1.x 使用广泛。文档
下载 npm install vue-resource --save

1
2
3
4
5
6
7
8
9
10
11
12
13
14
// 引入模块
import VueResource from 'vue-resource'
// 声明使用插件
// 内部会给vm对象和组件对象添加一个属性:$http
Vue.use(VueResourcejs)

// 通过 vue/组件对象发送 ajax 请求
this.$http.get('/someUrl').then((response) => {
// success callback
console.log(response.data) //返回结果数据
}, (response) => {
// error callback
console.log(response.statusText) //错误信息
})

axios

通用的 ajax 请求库, 官方推荐, vue2.x 使用广泛。
下载 npm install axios --save

1
2
3
4
5
6
7
8
9
10
// 引入模块
import axios from 'axios'
// 发送 ajax 请求
axios.get(url)
.then(response => {
console.log(response.data)
})
.catch(error => {
console.log(error.message)
})

搜索github用户 源码下载

UI 组件库

配置

1
2
# 下载 Mint UI
npm install --save mint-ui
1
2
3
4
5
6
7
8
9
10
11
12
13
<!-- 实现按需打包 -->
1. 下载
npm install --save-dev babel-plugin-component
2. 修改 babel 配置
"plugins": [
[
"component",
{
"libraryName": "mint-ui",
"style": true
}
]
]

使用

mint-ui 组件分为 标签组件 与 非标签组件

1
2
3
4
5
<!-- 文件结构 -->
|-- src
|-- App.vue
|-- main.js
|-- index.html
1
2
3
4
5
6
7
8
9
10
11
12
13
14
15
16
17
18
<!-- index.html -->
<meta name="viewport" content="width=device-width, initial-scale=1, maximum-scale=1, minimum-scale=1, user-scalable=no" />

<body>
<div id="app"></div>
<!-- built files will be auto injected -->
<script src="https://as.alipayobjects.com/g/component/fastclick/1.0.6/fastclick.js"></script>
<script>
if ('addEventListener' in document) {
document.addEventListener('DOMContentLoaded', function () {
FastClick.attach(document.body);
}, false);
}
if (!window.Promise) {
document.writeln('<script src = "https://as.alipayobjects.com/g/component/es6-promise/3.2.2/es6-promise.min.js" ' + ' > ' + ' < ' + ' / ' + 'script > ');
}
</script>
</body>
1
2
3
4
5
6
7
8
9
10
11
12
13
14
// main.js
import Vue from 'vue'
import App from './App.vue'
import { Button } from 'mint-ui'

// 注册成标签(全局)
Vue.component(Button.name, Button)

/* eslint-disable no-new */
new Vue({
el: '#app',
components: { App },
template: '<App/>'
})
1
2
3
4
5
6
7
8
9
10
11
12
13
14
15
// App.vue
<template>
<mt-button type="primary" @click="handleClick" style="width: 100%">Test</mt-button>
</template>

<script>
import { Toast } from 'mint-ui'
export default {
methods: {
handleClick() {
Toast('提示信息')
}
}
}
</script>

vue-router

官方提供的用来实现 SPA 的 vue 插件。文档
下载npm install vue-router --save

路由组件

  1. VueRouter(): 用于创建路由器的构建函数
    1
    2
    3
    new VueRouter({
    // 多个配置项
    })
  2. 路由配置
    1
    2
    3
    4
    5
    6
    7
    8
    9
    10
    routes: [
    { // 一般路由
    path: '/about',
    component: About
    },
    { // 自动跳转路由
    path: '/',
    redirect: '/about'
    }
    ]
  3. 注册路由器
    1
    2
    3
    4
    import router from './router'
    new Vue({
    router
    })
  4. 使用路由组件标签
    • <router-link>: 用来生成路由链接
      <router-link to="/xxx">Go to XXX</router-link>
    • <router-view>: 用来显示当前路由组件界面
      <router-view></router-view>

向路由组件传递数据

  • 路由传参(param)

    1. 配置路由
      1
      2
      3
      4
      5
      6
      children: [
      {
      path: 'mdetail/:id',
      component: MessageDetail
      }
      ]
    2. 路由路径
      <router-link :to="'/home/message/mdetail/'+m.id">{{m.title}}</router-link>
    3. 路由组件中读取请求参数
      this.$route.params.id
  • 路由传参(query)

    1. 在地址的后面 写上 ?分隔
    2. 通过 key=value&key2=value 的方式添加参数
    3. 组件中通过 this.$route.query 访问对应的 key 即可获取数据
  • 属性携带数据
    <router-view :msg="msg"></router-view>

缓存路由组件对象

  • 默认情况下, 被切换的路由组件对象会死亡释放, 再次回来时是重新创建的
  • 如果可以缓存路由组件对象, 可以提高用户体验
    1
    2
    3
    <keep-alive>
    <router-view></router-view>
    </keep-alive>

相关 API

  • this.$router.push(path): 相当于点击路由链接(可以返回到当前路由界面)
  • this.$router.replace(path): 用新路由替换当前路由(不可以返回到当前路由界面)
  • this.$router.back(): 请求(返回)上一个记录路由
  • this.$router.go(-1): 请求(返回)上一个记录路由
  • this.$router.go(1): 请求下一个记录路由

前端history路由的问题

页面中加载的资源相对路径会根据地址栏的变化而变化,所以要使用绝对路径,或相对于根目录的路径需要声明base属性,以说明地址中哪部分是前端路由部分,哪部分是后端路由部分。
以特定url开头的地址都需要返回该url对应的内容。
该模式不利于缓存。

vue-router源码 下载

vuex

了解

文档
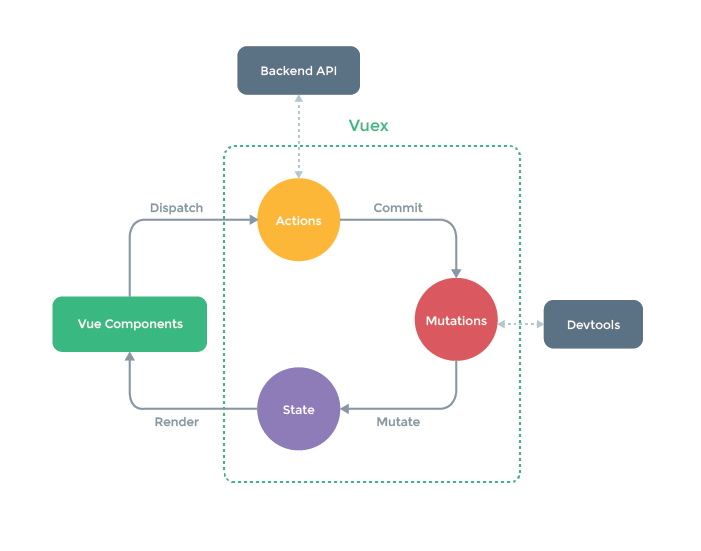
简单来说: 对 vue 应用中多个组件的共享状态进行集中式的管理(读/写)

  • 状态自管理应用
    state: 驱动应用的数据源
    view: 以声明方式将 state 映射到视图
    actions: 响应在 view 上的用户输入导致的状态变化(包含 n 个更新状态的方法)【一个action是一个函数】
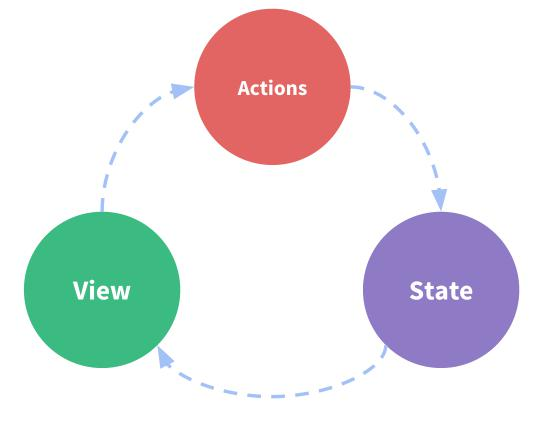
    状态自管理
  • 多组件共享状态的问题
    1. 多个视图依赖于同一状态
    2. 来自不同视图的行为需要变更同一状态
    3. 以前的解决办法
      1. 将数据以及操作数据的行为都定义在父组件
      2. 将数据以及操作数据的行为传递给需要的各个子组件(有可能需要多级传递)
    4. vuex 就是用来解决这个问题的

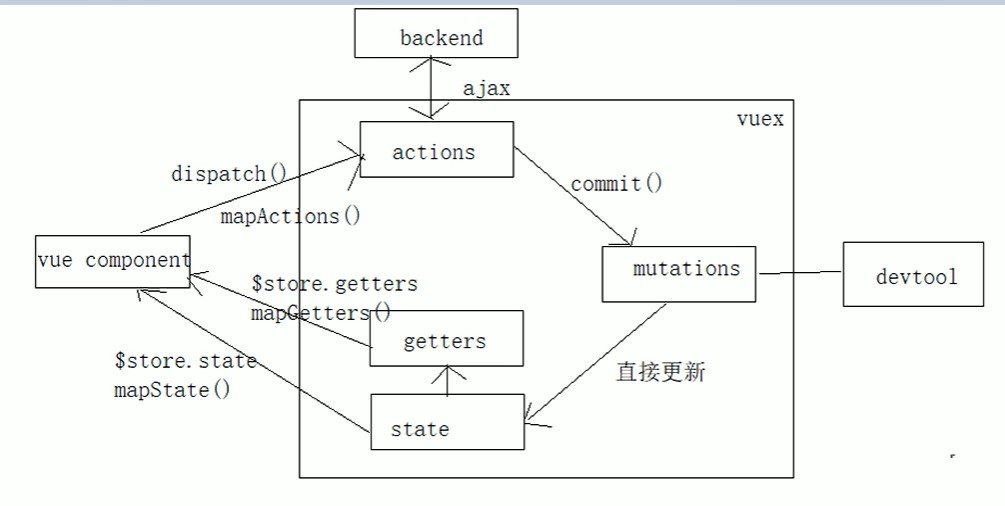
核心概念和 API

vuex

  1. state

    • vuex管理的状态对象
    • 它应该是唯一的
      1
      2
      3
      const state = {
      xxx: initValue
      }
  2. mutations

    • 包含多个直接更新 state 的方法(回调函数)的对象
    • 谁来触发:action 中的 commit(‘mutation 名称’)
    • 只能包含同步的代码,不能写异步代码
      1
      2
      3
      4
      5
      const mutations = {
      yyy(state, {data1}){
      // 更新 state 的某个属性
      }
      }
  3. actions

    • 包含多个事件回调函数的对象
    • 通过执行: commit()来触发 mutation 的调用, 间接更新 state
    • 谁来触发: 组件中: $store.dispatch(‘action 名称’, data1) // ‘zzz’
    • 可以包含异步代码(定时器, ajax)
      1
      2
      3
      4
      5
      const action = {
      zzz({commit, state}, data1){
      commit('yyy', {data1})
      }
      }
  4. getters

    • 包含多个计算属性(get)的对象
    • 谁来读取: 组件中: $store.getters.xxx
      1
      2
      3
      4
      5
      const getters = {
      mmm(state){
      return ...
      }
      }
  5. store 对象

    1
    2
    3
    4
    5
    6
    7
    8
    9
    10
    11
    12
    13
    14
    15
    // 向外暴露 store 对象
    // store.js
    export default new Vuex.Store({
    state, // 状态
    getters, // 包含多个getter计算属性函数的对象
    mutations, // 包含多个更新state函数的对象
    actions, // 包含多个对应事件回调函数的对象
    }

    // 映射 store
    // main.js
    import store from './store'
    new Vue({
    store
    })
    • 所有用 vuex 管理的组件中都多了一个属性$store, 它就是一个 store 对象
    • 属性:
      • state: 注册的 state 对象
      • getters: 注册的 getters 对象
    • 方法:
      • dispatch(actionName, data): 分发调用 action
  6. 组件中简化语法

    1
    2
    3
    4
    5
    6
    7
    8
    9
    10
    11
    12
    13
    14
    15
    16
    17
    18
    19
    20
    21
    22
    23
    24
    25
    26
    27
    // App.vue
    import {mapState, mapGetters, mapActions} from 'vuex'
    export default {
    /* computed: {
    count () {
    return this.$store.state.count
    },
    evenOrOdd () {
    return this.$store.getters.evenOrOdd
    }
    }, */
    computed: {
    ...mapState(['count']),
    ...mapGetters(['evenOrOdd'])
    },
    /*methods: {
    increment () {
    this.$store.dispatch('increment')
    },
    decrement () {
    this.$store.dispatch('decrement')
    }
    } */
    methods: {
    ...mapActions(['increment', 'decrement'])
    }
    }
  7. modules

    • 包含多个 module
    • 一个 module 是一个 store 的配置对象
    • 与一个组件(包含有共享数据)对应

例子

1
2
3
4
5
6
7
8
9
10
11
12
13
14
15
16
17
18
19
20
21
22
23
24
25
26
27
28
29
30
31
32
33
34
35
36
37
38
39
40
41
42
43
44
45
46
47
48
49
50
51
52
53
54
55
// 普通写法
// App.vue
<template>
<div>
<p>click {{ count }} times, count is {{ evenOrOdd }}</p>
<button @click="increment">+</button>
<button @click="decrement">-</button>
<button @click="incrementIfOdd">increment if odd</button>
<button @click="incrementAsync">increment async</button>
</div>
</template>

<script>
export default {
data() {
return {
count: 0
}
},
computed: {
evenOrOdd() {
return this.count % 2 === 0 ? '偶数' : '奇数'
}
},
methods: {
// 增加
increment() {
const count = this.count
this.count = count + 1
},
// 减少
decrement() {
const count = this.count
this.count = count - 1
},
// 如果是奇数才增加
incrementIfOdd() {
const count = this.count
if (count % 2 === 1) {
this.count = count + 1
}
},
// 过1秒才增加
incrementAsync() {
setTimeout(() => {
const count = this.count
this.count = count + 1
}, 1000)
}
}
}
</script>

<style>
</style>
1
2
3
4
5
6
7
8
9
10
// main.js
import Vue from 'vue'
import App from './App.vue'

/* eslint-disable no-new */
new Vue({
el: '#app',
components: { App },
template: '<App/>'
})

1
2
3
4
5
6
7
8
9
10
11
12
13
14
15
16
17
18
19
20
21
22
23
24
25
26
27
28
29
30
31
32
33
34
35
36
37
38
39
40
41
42
43
// 用vuex
// App.vue
<template>
<div>
<p>click {{ count }} times, count is {{ evenOrOdd }}</p>
<button @click="increment">+</button>
<button @click="decrement">-</button>
<button @click="incrementIfOdd">increment if odd</button>
<button @click="incrementAsync">increment async</button>
</div>
</template>

<script>
export default {
computed: {
evenOrOdd() {
return this.$store.getters.evenOrOdd
}
},
methods: {
// 增加
increment() {
// 通知vuex去增加
this.$store.dispatch('increment') // 触发store中对应的action调用
},
// 减少
decrement() {
this.$store.dispatch('decrement')
},
// 如果是奇数才增加
incrementIfOdd() {
this.$store.dispatch('incrementIfOdd')
},
// 过1秒才增加
incrementAsync() {
this.$store.dispatch('incrementAsync')
}
}
}
</script>

<style>
</style>
1
2
3
4
5
6
7
8
9
10
11
12
13
14
15
16
17
18
19
20
21
22
23
24
25
26
27
28
29
30
31
32
33
34
35
36
37
38
39
40
41
42
43
44
45
46
47
48
49
50
51
52
53
54
55
56
57
58
59
60
61
62
63
64
65
66
// store.js
// vuex的核心管理对象模块:store
import Vue from 'vue'
import Vuex from 'vuex'

Vue.use(Vuex)

// 状态
const state = { // 初始化状态
count: 0
}

// 包含多个更新state函数的对象
const mutations = {
// 增加的mutation
INCREMENT(state) {
state.count++
},
// 减少的mutation
DECREMENT(state) {
state.count--
}
}

// 包含多个对应事件回调函数的对象
const actions = {
// 增加的action
increment({ commit }) {
// 提交增加的mutation
commit('INCREMENT')
},

// 减少的action
decrement({ commit }) {
commit('DECREMENT')
},

// 带条件的action
incrementIfOdd({ commit, state }) {
if (state.count % 2 === 1) {
commit('INCREMENT')
}
},

// 异步的action
incrementAsync({ commit }) {
// 在action中直接就可以执行异步代码
setTimeout(() => {
commit('INCREMENT')
}, 1000);
}
}

// 包含多个getter计算属性函数的对象
const getters = { // 不需要调用,只需要读取属性值
evenOrOdd(state) {
return state.count % 2 === 0 ? '偶数' : '奇数'
}
}

export default new Vuex.Store({
state, // 状态
mutations, // 包含多个更新state函数的对象
actions, // 包含多个对应事件回调函数的对象
getters, // 包含多个getter计算属性函数的对象
})
1
2
3
4
5
6
7
8
9
10
11
12
// main.js
import Vue from 'vue'
import App from './App.vue'
import store from './store'

/* eslint-disable no-new */
new Vue({
el: '#app',
components: { App },
template: '<App/>',
store // 所有组件对象都多了一个属性:$store
})

1
2
3
4
5
6
7
8
9
10
11
12
13
14
15
16
17
18
19
// App.vue优化
import { mapState, mapGetters, mapActions } from 'vuex'
export default {
computed: {
// mapState()返回值: {count(){return this.$store.state['count']}}
...mapState(['count']),
// mapGetters()返回值: {evenOrOdd(){return this.$store.getters['eventOrOdd']}}
...mapGetters(['evenOrOdd'])
},

methods: {
...mapActions([
'increment',
'decrement',
'incrementIfOdd',
'incrementAsync'
])
}
}

vuex结构
所有项目源代码 下载

render

1
2
3
4
5
6
// main.js
new Vue({
el: '#app',
components: { App }, // 映射组件标签
template: '<App/>' // 指定需要渲染到页面的模板
})

上述代码可以简写为:

1
2
3
4
5
// main.js
new Vue({
el: '#app',
render: h => h(App)
})

其中,render函数相当于:

1
2
3
function (createElement) {
return createElement(App)
}

web前端学习笔记14——使用Vue模板
http://example.com/posts/5f4b0425.html
作者
Fehek
发布于
2021年3月14日
许可协议